Part 3: Planning Our Project

This is the third tutorial in our series(Building REST API with Go).Make sure you have read the previous tutorial Building a hello world rest api so that you can understand how a basic rest api works.
Note:This series assume that you are an absolute beginner in go thus for those who are familiar with go should forgive my tendency of explaining even the most basic concepts.
The most important part of any project is planning.
Failure to plan a project will lead to trouble down the road since you will be changing features unnecessary.
Understanding the features of our rest api
- Our api should receive a request from a user and know which handler to call for any request.(Using a router)git reset
- Our api should be in a position to register user and login a user.
- Password should be encrypted for security.(using bycrpt)
- Protected endpoint should be accessible only to authorized users.(using jwt token)
- Our api should persist all the data in a postgres database.
- We should be in a position to query all our data using an orm.(Gorm in this case).
- All errors should be handled and our api should return the right error code.
- All data must be validated to prevent entry of invalid data.
How the rest Api will work
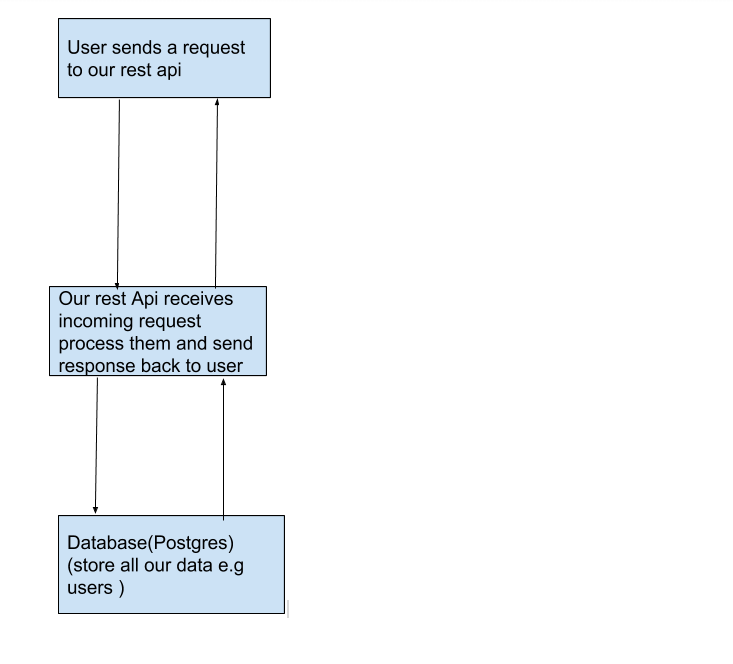
A request will always be triggered by a user.(E.g A request to register or login )
Once our rest api receives the request it will process it.
If it need any access of data in our postgres database it will query for the data(using gorm) and return a response to the user.
Entities (models) in our api
As you may have noted by now the main entities in our system by now are.
- Food -which will have fields such (Name,price,id)
- Customers(users) -Which will have fields such as-(first name,second_name,address)
- Orders -Which will have entities such as (id,customer_id,date)
- Order Items -Which will hold all items in an order (order_id,id,food_id,price)
- Admin -Who will add food and remove users and accept orders.
- Address -Which will have fields such as (Name,id)
All this will be represented in a go struct and then stored in a postgres database using gorm.
Below is an example of how we will represent the food entity for example.
|
|
Examining the libraries we will be using And there purpose
- Chi router -As we mentioned in part two of this series,a router determines which handler(function)will be called whenever a user sends a request. We have so many routers out there but i find chi router so simple and very easy to integrate in a project. It will allow us to hook in our middleware so easily.
Gorm orm- When it comes to accessing the database,it is always a good idea to use an orm.It will help you avoid some common mistake. Gorm has an excellent syntax and is very well documented.
Postgres- connecting to postgres using gorm is straight forward.However if you get any issue using postgres you can always switch to sqlite and the code will still be compatible.
Our project structure
In the previous tutorial we talked about packages.
Packages is a simple way to organize your related code together in golang.
We are going to structure this code into packages to make it easy for us to manage and test.
There are two ways we can do this.
One we can decide make packages according to entities.ie all user related code such as models,routers,and handlers can be in one package called users. We would do the same for orders and any other entity we have.
The second approach is to put all handlers and call that package handlers.Then put all models in another package and call it models.
For simplicity we are going to use the second approach.And this is how our project structure will look.
food-delivery
    main.go
    handlers
       handlers.go
    models
       models.go
    util
       util.go
    database
       database.go

    migrations
       migrations.go
The handlers folder will hold the handlers.go file in which we will write all our logic (functions to be called when a request is sent).
The models folder will contain the models.go file which will hold all the struct(objects) that we will store in our database.
The main.go will be the entry point to our api.
The database.go -is where we are going to initialize our global database handle that will allow us to use in the whole app.
Finally the util.go will have any method that we need shared in our app,such as jwt token validation,password hashing and such.
The migrations.go -is where we write all our database migrations.
Conclusion
Now that we know what our project will do and how it will be structured ,in the next tutorial we are going to start working on the project.
Brase yourself for the fun is about to begin !!!