Part 2: Building A Hello,world Rest Api Endpoint In Go

This is the second tutorial in our series(Building REST API with Go).Make sure you have read the first tutorial Introduction and installation of golang so that you can know how to install go, understand what golang is and also get a full idea of what we will be building in this series(A food delivery app).
Note:This series assume that you are an absolute beginner in go thus for those who are familiar with go should forgive my tendency of explaining even the most basic concepts.
They is no better way to learn and understand programming than to write code.In this tutorial we are going to write a hello world api in go.
This will warm you up for the upcoming journey that we will take together.
The go workspace
A workspace is a directory in your system where go looks for your source code.Whenever a go program hits import it looks for package(s) in Go’s standard library ($GOROOT/src).
If a package is not present there, then Go refers to system’s environment variable GOPATH which is path to Go workspace directory and looks for packages in $GOPATH/src directory.
Setting up the go workspace on mac and linux
For mac and linux the go workspace is located in $HOME/go so go ahead and create a go directory inside $HOME.
Setting up the go workspace on windows
In windows the the workspace is located in C:\Users\YourName\go.So go ahead and create a go directory inside C:\Users\YourName.
Workspace directory structure
All the source file for our projects should be located in a directory named src inside the workspace.
Go ahead and create the src folder inside the go directory we created in the steps above.
Every project you create will have its own folder inside the src folder.For example for our food delivery project this would be the structure.
go
   src
      food-delivery
Building A Hello,world Rest Api in Go
Inside the food-delivery folder create a file called main.go and copy the code below.
|
|
package main-Each and every file in go should start with a package name.Package are used to organize your code.
func main(){ }-This is the syntax we use to define function in go.The main function is a special function in go() and should always be in the main package.
The program execution starts in the main function .
func SayHello(w http.ResponseWriter, r *http.Request) {} - This is called a handler.
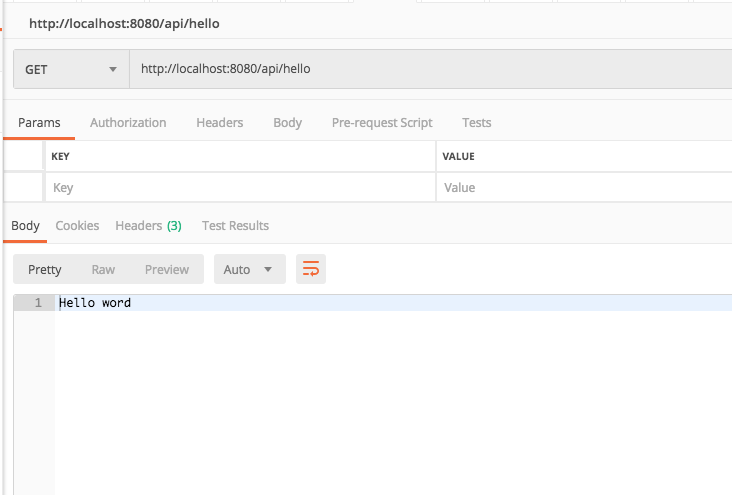
Handlers are functions that define all the operation that will take place when we call an endpoint with a given url. For instance if you sent a get request to the url http://localhost:8080/api/hello.The SayHello function will be invoked and will print hello world.
A handler function takes two parameters:
One is of type http.ResponseWriter - this is where you write all the data you want to send back to the user such as contentType(in its header),the body or anything you want the user to receive back.
The second is of type * http.Request - this has all data that the user sent as part of the request.Its has items like Host name,path parameters and even query parameters.
fmt.Fprintf(w, Hello word) - we define the response we want returned when a person calls the SayHello function.
http.NewServeMux() -We create a new router.
A router maps an endpoint to a function.That is it defines what methods should be called when a request is sent to an endpoint.
http.ListenAndServe(“0.0.0.0:8080”, handler) -finally we tell our program to listen to all request sent to port 8080.
Running our program
Now our program is complete.Its time to see the magic happen.
Open the terminal and enter the following command.
go run workspacepath/src/food-delivery/main.go
where workspacepath/src/food-delivery is the path to your project.
Now if you visit the url http://localhost:8080/api/hello on your browser or from postman you should see the word hello world printed.
The code is available for download on github.
Conclusion
Thank you for making it to the end of this tutorial.
I hope i will meet you in the next tutorial(Part 3:Building a Basic Restful Api With Golang) .
Leave any comment or any improvement that you think can be made so that we can make this series a success.
If you find any issue (or your code fails) don’t hesitate to reach out.
Cheers !!.Happy coding